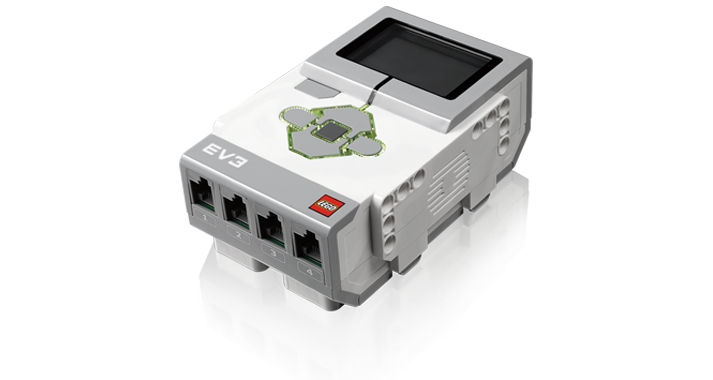
A Scratch-like and JavaScript development environment for Lego Mindstrom EV3
1. About
1.1. Javascript on the EV3
Provide a simple and powerful way to program on the EV3 with Javascript.
-
Gnikrap is straightforward to use.
-
Gnikrap can be used on a computer or a tablet, in fact any device that have a modern browser (HTML5 compatible).
-
Javascript, is currently one of the more popular scripting language
-
Code autocompletion (since 0.5.0) make writing JavaScript really more easier.
1.2. Scratch-like on the EV3
Since version 0.5.0 a Scratch-like editor has been added to Gnikrap in order to write program simply. This feature has been added mainly to provide to kids that are often familiar with Scratch-like applications/games a simple way to start before moving towards JavaScript programming.
-
A Scratch-like editor to program the EV3 brick simply (even more simple than the programing environment provided with the Mindstrom).
-
Generation of clean JavaScript code from any Scratch-like program: This provide an easy way to JavaScript programming.
|
The graphical editor is based on the Blockly library. |
1.3. Empower your device' sensors
Gnikrap give the opportunity to use the tablet sensors in the same way as if this is sensor directly linked to the EV3 device. The list of XSensors (for eXternal Sensors) available right now is:
-
xTouch: A 24 touch tactile screen that enable to remotely pilot a robot in a simple way (see The xTouch XSensor for more details).
-
XGyro: Use the gyroscope of your mobile device (eg. tablet) in order to control a robot (see The xGyro XSensor for more details).
-
xVideo: Use the webcam of any device (tablet, computer) in order to track objects (see The xVideo XSensor for more details) and make your robot react to the environment.
-
xGeo: Use the GPS of your device (eg. tablet or smartphone) in order to send GPS coordinate to the EV3 (see The xGeo XSensor for more details).
|
XSensors are available only in JavaScript mode. |
1.4. Full documentation available
You are at the right place to evaluate it ! Just have look to see if it’s ok for you :-)
1.5. Why don’t use Gnikrap
Gnikrap is nice, but you’re not sure… Here are some element that can make you use another tool/library to program with the EV3 :
Note: Gnikrap is internally based on leJOS.
|
To sum up, the three main objective of Gnikrap are:
|
2. How to install
2.1. Prerequesite: Install leJOS
|
Version 0.5.0 of Gnikrap work with LeJOS 0.9.0-beta |
Before installing Gnikrap, you need to have a working leJOS firmware. Moreover, a network (either Wifi or bluetooth should have been configured.
- Lejos installation
-
-
Download and install leJOS as described on the page: Installing leJOS
-
Configure a network link between your computer and the EV3:
-
Either with Wifi, see Configuring Wifi
-
Either with bluetooth PAN, see Pairing (from the PC)
-
-
While leJOS is correctly setup and configured, you should have a screen like the following one:

You can notice the IP adress which is in this snapshot: 10.0.1.1
2.2. Install for Windows users
You’re lucky, you benefit of a full automated install.
-
Download the Gnikrap distribution for Windows here (file gnikrap-install-windows-<Version>.zip)
-
Unzip the distribution and launch the program
insall_on_ev3.exe. This program will ask you the IP address of the EV3 and will install leJOS on the EV3.
Note: The IP address is displayed on the screen while leJOS is installed and running.
That’s all ! You can now run Gnikrap, see Launch Gnikrap
2.3. Install for non Windows users
-
Download the Gnikrap distribution for all operating systems (install-all) here (file gnikrap-install-all-<Version>.tar.gz)
-
Upload the tar.gz file on the brick. You can upload on the brick by using the a software that implement the SCP protocol (eg on Windows: WinSCP)
-
Once uploaded, you need to connect (either with telnet or ssh) to the EV3. (eg on Windows, Putty)
Note: The login to use is "root" and there is no password. -
Once connected, decompress the tar.gz file with a command like:
tar -xzf gnikrap-install-all-<Version>.tar.gz(Replace <Version> with the right version according to the file you have) -
Go to the folder just created with a command like:
cd gnikrap-install-all-<Version>(Here again, <Version> has to be replaced with the right version) -
Last but not least, launch the Gnikrap install with the command:
./install.sh
Note: If Gnikrap has already been installed, the program can prompt you to confirm the uninstallation/update of the previously installed version.
2.4. Launch Gnikrap
-
With the leJOS menu go to Programs menu click on the middle button.
-
On the Files list, select Gnikrap and click again on the middle button.
-
Select Execute program (this is the default) and click again on the middle button.
-
The following screen is displayed:
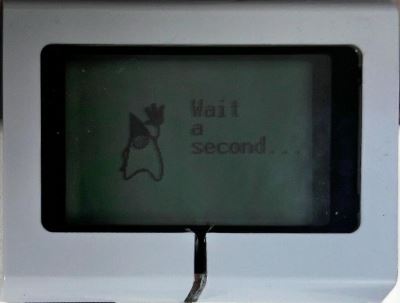
Just wait about 20 seconds. Then an empty screen will be displayed for a few seconds. Again just wait.
-
Once Gnikrap was launched, you can connect with a browser (Note: Once the Gnikrap welcome screen was displayed, you have to wait a few seconds
before being able to connect with a browser).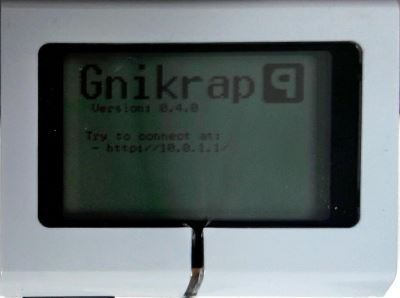
Note: In order to come back to the leJOS menu, you have to stop Gnikrap by using the
Gnikrapmenu in the any browser connected to the brick.
|
If you want to have Gnikrap started automatically at the EV3 brick startup, you have to select Set as Default. |
3. Quick overview
3.1. Main screen
You can first have a look to video that introduce the main concept of Gnikrap: Gnikrap introduction to EV3 programming with Javascript
The main screen of Gnikrap is divided in 3 main areas:
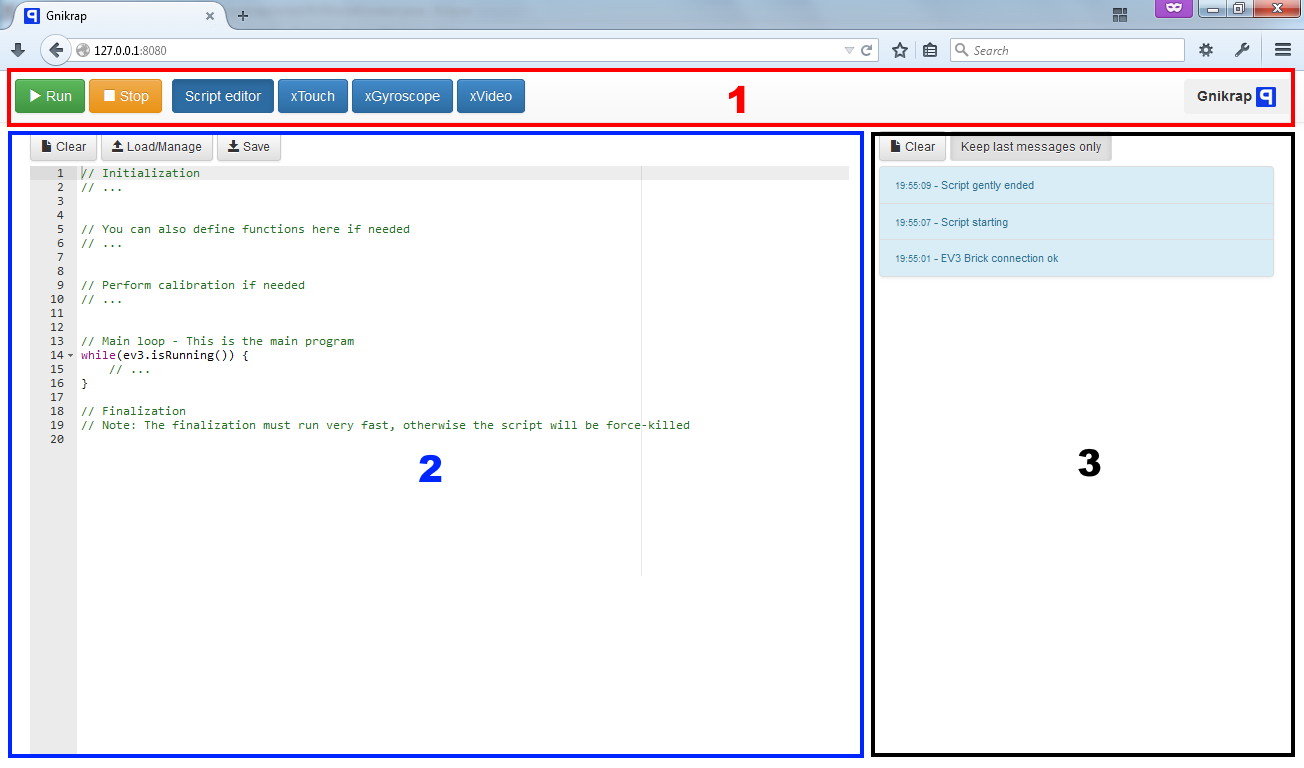
-
The main actions and navigation are in this header.
-
The Run/Stop button enable to start the program and to stop it.
-
The "Script editor" button enable to display the work-area that enable to edit the script.
-
The "x*" buttons enable to go the work-area of the xSensors.
The xSensors working zone are described in more details in the part: The XSensor object -
The "Gnikrap" button give access to a small menu.
-
-
The work-area contains the data for the selected navigation.
The content of this area will change according to the current active work area. It is worth to notice that even if not displayed the work area still "work". This behaviour is important for xSensors: You can use 2 xSensors at the same time on the same device (or you can use an xSensors and edti at the same time. -
The notification area contains all the notification from Gnikrap (start/stop program, errors, etc.) and also the notifications of your program.
The Gnikrap menu give access to following features:
-
Toggle full screen: Toggle the browser in full screen mode (no more title bar/status bar/task bar displayed)
-
Import images: This screen give the ability to generate the code (including the image data) in order to use images within Gnikrap.
-
Stop Gnikrap: Either stopping Gnikrap and come back to the leJOS menu or stopping (shutdown) the E3 brick.
-
Settings: Display the configuration of Gnikrap:
-
Can switch the language of the graphical user interface (currently English and rench are available)
-
Can switch from JavaScript and Blockly (Scratch-like) programming mode
-
-
Documentation: Give access to an embedded version of the documentation.
Note: In order to have the up to date version of the documentation please visit the Gnikrap site: http://jbenech.github.io/gnikrap/ -
About box: Give standard informations on licensing and author.
3.2. Scratch-like editor
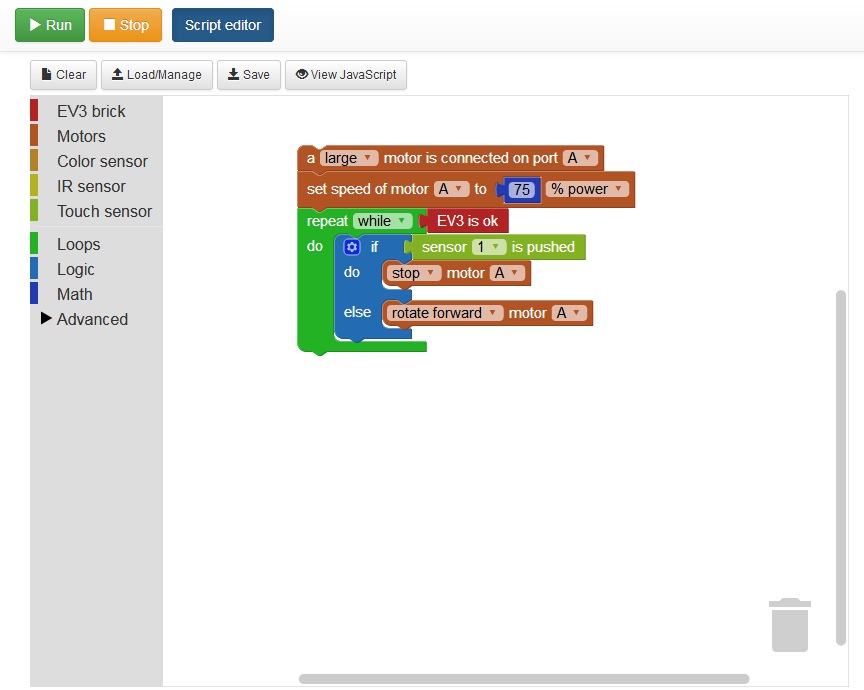
In order to enable this graphical editor:
-
Click on "Gnikrap" on the top-right of the screen.
-
Choose "Settings".
-
Select "Visual" in programming style.
-
And finally save the settings.
On each blocks, an integrated help is available through tooltips.
If you need more help on this editor, please contact the author or open an issue here.
|
A way to have more detailed documentation on blocks is to visualize the JavaScript code and consult the documentation of JavaScript functions (in this page) corresponding to the blocks. |
4. Script API
4.1. General principles
The API has been designed to be simple to use. Here are some explanation that will help you to use the API in a more efficient way:
-
Single entry point: All the API can be accessed from the a single object:
ev3(see The ev3 object for more details).-
All the stuff physically linked to the EV3 brick can be accessed from the object:
ev3.getBrick()(see The Brick object for more details).
-
-
Method naming convention (don’t be afraid, there is nothing exotic here) :
-
All the methods names starts with an verb.
-
All the methods starting by
isalways returns a boolean (i.e.trueorfalse). -
All the methods starting with
getare getters and will return a value. -
All the methods starting with
setare setters and will set a value. -
The API is English based.
-
-
All the times are expressed in milliseconds (1 second is equals to 1000 milliseconds).
-
All the angles are expressed in degrees (in general negative and positive degrees are accepted).
4.2. JavaScript autocompletion
Since version 0.5.0, the JavaScript editor has an autocompletion feature. In order to enable it, while editing press Ctrl+Space. The list of available functions will be displayed. According to the current context the more relevant items are at the begining of the list but the list always contains all the items.
|
The relevance of the items is based on the context, and more specifically on some keywords. So if you want to maximize the autocompletion help, you must use keywords in your variable names.
For example, you retreive a motor with the function |
4.3. The ev3 object
|
This object is the entry point of the Gnikrap API. In other word, you can access to all the Gnikrap feature from this object. |
4.3.1. Configuration object
|
Configuration object is for advanced usage only. If you don’t understand what it means, don’t use this object. |
4.4. The Brick object
|
This object is the entry point for all the stuff that is connected to the brick. That is to say, that if you want to access to the brick or something connected to the brick, this object will be the good starting point. |
See the others objects in order to have sample usage of the brick object.
4.5. The Motor object
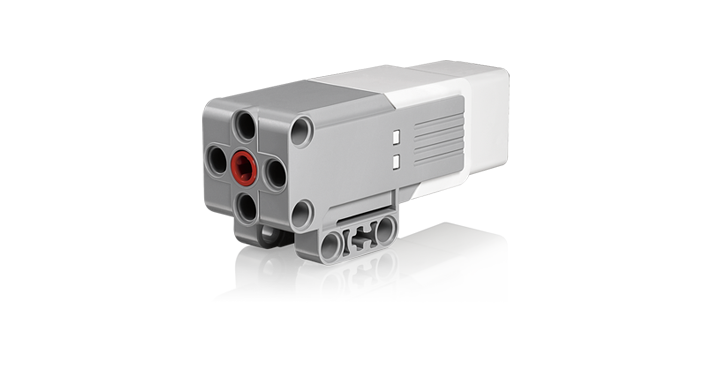

|
On the motor API, some call wait that the operation is ended on the motor (so when the function returns the motor has ended the expected move) while other immediately returns (so the motor is still operating/moving while the function returns). The behaviour is specified for each function. |
Sample code for the Motor object:
var largeMotor = ev3.getBrick().getLargeMotor("B");

// Rotate and wait end of rotation
largeMotor.rotate(360);
largeMotor.setSpeedPercent(100);
largeMotor.rotate(-360);

// Retrieve tacho
largeMotor.rotate(60);
ev3.notify("TachoA: " + largeMotor.getTachoCount());
largeMotor.rotate(-60);
ev3.notify("TachoB: " + largeMotor.getTachoCount());
largeMotor.resetTachoCount();
ev3.notify("TachoC: " + largeMotor.getTachoCount());

// Rotate and don't wait
var tacho;
largeMotor.rotate(360 * 3, true);
while((tacho = largeMotor.getTachoCount()) < 1000) {
  ev3.notify("Tacho: " + tacho);
  ev3.sleep(200);
}
4.6. The Color sensor object
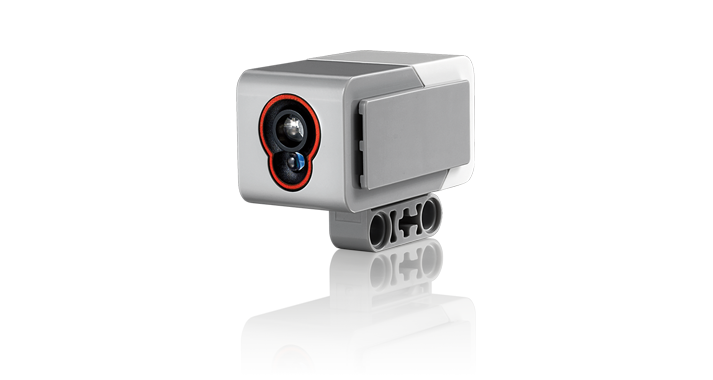
|
This sensor has 3 different modes. It is worth noting that switching from one mode to the other take time (around 250ms). Here is two examples:
|
4.6.1. Color object
Sample code for the color sensor:
var colorSensor = ev3.getBrick().getColorSensor("S1");
while(ev3.isOk()) {
  ev3.notify("Reflected light: " + colorSensor.getReflectedLight());
  ev3.sleep(200);
}var colorSensor = ev3.getBrick().getColorSensor("S1");
while(ev3.isOk()) {
ev3.notify("Ambient light: " + colorSensor.getAmbientLight());
ev3.sleep(200);
}var colorSensor = ev3.getBrick().getColorSensor("S1");
while(ev3.isOk()) {
ev3.notify("Color: " + colorSensor.getColor());
ev3.sleep(200);
}4.7. The IR (Infra-Red) sensor object
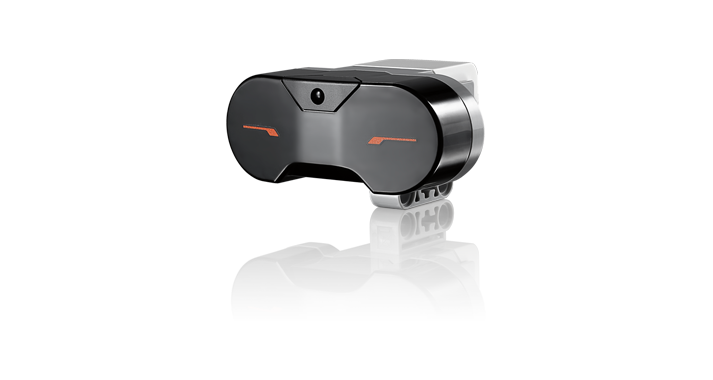
|
This sensor has 3 different modes. It is worth noting that switching from one mode to the other take time (around 250ms). Here is two examples:
|
4.7.1. RemoteCommandResult object
4.7.2. SeekBeaconResult object
Sample code for the IR sensor object:
var irSensor = ev3.getBrick().getIRSensor("S1");
while(ev3.isOk()) {
  ev3.notify("Distance: " + irSensor.getDistance());
  ev3.sleep(200);
}var irSensor = ev3.getBrick().getIRSensor("S1");
while(ev3.isOk()) {
var x = irSensor.seekBeacon();
ev3.notify("Beacon found: " + x.isBeaconFound() + ", bearing: " + x.getBearing() + ", distance: " + x.getDistance());
ev3.sleep(200);
}var irSensor = ev3.getBrick().getIRSensor("S1");
while(ev3.isOk()) {
var x = irSensor.getRemoteCommand();
ev3.notify("value: " + x.getValue() +
", tl: " + x.isTopLeftEnabled() + ", tr: " + x.isTopRightEnabled() +
", bl: " + x.isBottomLeftEnabled() + ", br: " + x.isBottomRightEnabled() +
", bea: " + x.isBeaconEnabled() + " nothing: " + x.isNothingEnabled());
ev3.sleep(200);
}4.8. The Touch sensor object
Sample code for the Touch sensor object
// Touch sensor API
var touchSensor = ev3.getBrick().getTouchSensor("S1");
while(ev3.isOk()) {
  ev3.notify("Push button: " + touchSensor.isPushed());
  ev3.sleep(200);
}
4.9. The NXTSound sensor object
| Experimental implementation for this sensor. |
4.10. The Ultrasonic sensor object
| Experimental implementation for this sensor. |
4.11. The Keyboard object
4.11.1. Button object
Sample code for the Keyboard object:
// Keyboard API
var enterKey = ev3.getBrick().getKeyboard().getEnter();
ev3.notify("Press enter to continue");
while(enterKey.isUp() && ev3.isOk()) {
  ev3.sleep(200);
}
ev3.notify("Enter - Down: " + enterKey.isDown() + " / Up: " + enterKey.isUp());
4.12. The Led object
Sample code for the Led object:
// Led API
var leds = ev3.getBrick().getLed();
leds.lightGreen();
ev3.sleep(2000);
leds.lightOrange().blink();
ev3.sleep(2000);
leds.lightRed().blink().blink();
ev3.sleep(2000);
leds.off();
4.13. The Sound object
Sample script with Sound object:
// Sound API
var sound = ev3.getBrick().getSound();
sound.setVolume(90);
sound.beep();
for(freq = 50; freq < 1500; freq = freq + 10) {
sound.playTone(freq, 5);
}
sound.playNote("Do", 500);
sound.playNote("Re", 500);
sound.playNote("Mi", 500);
sound.playNote("Fa", 500);
sound.playNote("Sol", 500);
sound.playNote("La", 500);
sound.playNote("Si", 500);
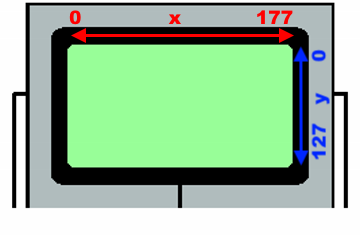
sound.playNote("Do4", 500);4.14. The Screen object
The EV3 screen is monochrome (only white and black) and has a resolution of 178x128.
Sample script with Screen object (drawing):
// Screen API
var screen = ev3.getBrick().getScreen();

screen.clear();

screen.drawText("Hello world !", 0, 0);

screen.drawLine(5, 20, 120, 20);

screen.drawRectangle(10, 30, 20, 30);
screen.fillRectangle(40, 30, 30, 20);

screen.drawCircle(90, 40, 15);
screen.fillCircle(130, 40, 15);

screen.drawArc(10, 70, 20, 30, 0, 180);
screen.fillArc(10, 70, 20, 30, 180, 180);

ev3.sleep(5000);
Sample script with Screen object (decode image):
// Screen API
// Decode an image from raw data (use Gnikrap 'import images' menu
var imgWorker02 = ev3.getBrick().getScreen().decodeImage("data:image/rgf;base64,sncAAAAAAAAAAAAAAAAAA" +
"AAAAAAAAAAAAAAAAAAAAAAAAAAAAAAAAAAAAAAAAAAAAAAAAAAAAAAAAAAAAAAAAAAAAAAAAAAAAAAAAAAAAAAAAAAAAAAAAAAAA" +
"AAAAAAAAAAAAAAAAAAAAAAAAAAAAAAAAAAAAAAAAAAAAAAAAAAAAAAAAAAAAAAAAAAAAAAAAAAAAACAJAAAAAAAAAAAAAAAAAAAA" +
"AAAAAAAACQACQAAAAAAAAAAAAAAAAAAAAAAAAAAAQggAAAAAAAAAAAAAAAAAAAAAAAAAECAAIAAAAAAAAAAAAAAAAAAAAAAAAAAE" +
"BJABAQAAAAAAAAAAAAAAAAAAAAAAACAAAIAAQAAAAAAAAAAAAAAAAAAAAAAACSAABAIAAAAAAAAAAAAAAAAAAAAAAAAABIQASAAA" +
"AAAAAAAAAAAAAAAAAAAAAAlAABAQgEAAAAAAAAAAAAAAAAAAAAAAAAAIRLQBwAAAAAAAAAAAAAAAAAAAABASSLQG8APAAAAAAAAA" +
"AAAAAAAAAAAAAAAAPxf0hkAAAAAAAAAAAAAAAAAAAAAICWA/n/gIQAAAAAAAAAAAAAAAAAAAAAAgCQ/8OJIAAAAAAAAAAAAAAAAA" +
"AAAAFAVgB/Q6YwBAAAAAAAAAAAAAAAAAAAA4P+vD4D/gAAAAAAAAAAAAAAAAAAAAADo//+HAP8EAwAAAAAAAAAAAAAAAAAAAPD//" +
"wcA/xAHAAAAAAAAAAAAAAAAAAAAPKD/JwD+cwAAAAAAAAAAAAAAAAAAAADYBfoPIMZ5AQAAAAAAAAAAAAAAAAAAAP6T4AcElncAA" +
"AAAAAAAAAAAAAAAAAAA7AKCBx8GwwAAAAAAAAAAAAAAAAAAAACWC6gfFZbmAAAAAAAAAAAAAAAAAAAAAJQigB8nB0cBAAAAAAAAA" +
"AAAAAAAAAAAkIcEH20jnAMAAAAAAAAAAAAAAAAAAADSCyAfCgv6AAAAAAAAAAAAAAAAAAAAAPQnCX7EgfAAAAAAAAAAAAAAAAAAA" +
"AAA4AtA/PkhSgAAAAAAAAAAAAAAAAAAAADqlwT5f4gQAAAAAAAAAAAAAAAAAAAAAMAPEOC/oKcBAAAAAAAAAAAAAAAAAAAAyi9BS" +
"hVqDQAAAAAAAAAAAAAAAAAAAACAXwQAQKj6AwAAAAAAAAAAAAAAAAAAABQ/kZASelcFAAAAAAAAAAAAAAAAAAAAQH8EAoDWugcAA" +
"AAAAAAAAAAAAAAAAAAI/pFIpLr1DgAAAAAAAAAAAAAAAAAAAKB8IwBAV68LAAAAAAAAAAAAAAAAAEAFCPmPVNX6+h8AAAAAAAAAA" +
"AAAAAAAECgg8D+qqlX/BwAAAAAAAAAAAAAAAACkQkDFf+pV/38DAAAAAAAAAAAAAAAAAAiVEqi/Wquq6gEAAAAAAAAAAAAAAAAAU" +
"SilAlrt3v9fAAAAAAAAAAAAAAAAAACEUgioJNpr7fYAAAAAAAAAAAAAAAAAgCilUgVJtf6/3wAAAAAAAAAAAAAAAAAAQUiVKBL6V" +
"fX6AwAAAAAAAAAAAAAAAECqEipFpKS/r1cHAAAcAAAAAAAAAAAAAAClYKgSqWp1/QAAAD4AAAAAAAAAAABQVUhVBaWS/q+rAAAAP" +
"gAAAAAAAAAAAACAErKqSCSp2t4AAAA/AAAAAAAAAAAAUFWkdFSVqqq/NQAAgD4AAAAAAAAAAAAAgAr5IqlUVWovAACA/gAAAAAAA" +
"AAAAKgqUPJUUqWqKiAAAEA/AAAAAAAAAAAAAECF9EmVqqqqAAAAoP4AAAAAAAAAAABUFSjhl6qqqqoAAACgPgAAAAAAAAAAAACgQ" +
"spfUFJV1QHgAFD/AAAAAAAAAAAAqgoUoP+KJKmqA/D/rz4AAAAAAAAAAAAAUEEF/ytJStUH8P+v/gAAAAAAAAAAAKoCFFD8X5JS9" +
"S/4/1//AQAAAAAAAAAAAFRBBdD/r6r+T/T/r/4BAAAAAAAAAABVARRQov7///+f+v9f/wEAAAAAAAAAAABUQQII9f//8z/1/7/+A" +
"AAAAAAAAACAqgAESELq///Af/z/V/8AAAAAAAAAAAAAKlECEND//wB/+f+//gAAAAAAAAAAgKoABJAAgf9/AGj6/9f/AAAAAAAAA" +
"AAAAFIhAUQI/n8A0fz/3z8AAAAAAAAAAIBKAAQkAYD4fwAE+f/XfwAAAAAAAAAAAACVkAAQIfS/AFH6/+9fAAAAAAAAAACAKgACB" +
"AQAwB8EhPz/+w8AAAAAAAAAAACAVEiQAACAnwAQ/f//DwAAAAAAAAAAgBIAAQEQABAGCED+//8HAAAAAAAAAAAAQCUkCAQAAAgCC" +
"P3//w8AAAAAAAAAAIAKgABCAAAAQgBA/v//DwAAAAAAAAAAACAJkgAQAEAAABD8//8BAAAAAAAAAACACqAAiIQAAAAIAP3//wEAA" +
"AAAAAAAAACgChIhACQAAABA+P//AAAAAAAAAAAAgAogAAAQAQIAAADw//8BAAAAAAAAAAAAIIlEhASAAAAQAOH//wAAAAAAAAAAA" +
"IAKIAAAACQQAAAAxP8/AAAAAAAAAAAAQKAKCQAgAAAAAAAA/z8AAAAAAAAAAAAABSBABAgAAAAEAEjqDwAAAAAAAAAAAABQigQgA" +
"gAgACAAAhQAAAAAAAAAAAAAAAIgEAEAAAAAAABAqQIAAAAAAAAAAAAAVIUEAAAAQCAAAAiSAAAAAAAAAAAAAAAAECCSRAAJBBEAQ" +
"CQAAAAAAAAAAAAAAFRFCQAQEgAAAAAICQAAAAAAAAAAAAAAABBAAIBAIiAAACAAAAAAAAAAAAAAAACoQhKSBAgICRIAgAoAAAAAA" +
"AAAAAAAAAAUAAAAAACAAAAoAAAAAAAAAAAAAAAAUEElCBCBECAgAIAKAAAAAAAAAAAAAAAICoAgAQiCBAIAEgAAAAAAAAAAAAAAA" +
"EBQFQIkIiCASAFABQAAAAAAAAAAAAAAgAJAKICABAgAhAoAAAAAAAAAAAAAAAAAVBWBKiogIZEAoAAAAAAAAAAAAAAAAAABQCSAg" +
"AQIBCoJAAAAAAAAAAAAAAAAgFQVgRQqkEAgAKAAAAAAAAAAAAAAAAAAACAUQIACEomkCgAAAAAAAAAAAAAAAACoSqESKUgAAAAgA" +
"AAAAAAAAAAAAAAAAEgUCkSAAKVSVQUAAAAAAAAAAAAAAAAAgKJQERUqAAAACAAAAAAAAAAAAAAAAAAAFAVKoIAqlUoBAAAAAAAAA" +
"AAAAAAAAACiqJAKKgAAEAIAAAAAAAAAAAAAAAAAAApFJVCAqqpCAAAAAAAAAAAAAAAAAAAAqChIhSoAAJQAAAAAAAAAAAAAAAAAA" +
"AAARRUoQFVVIQAAAAAAAAAAAAAAAAAAAAAooEIVAAAKAAAAAAAAAAAAAAAAAAAAAEAVFKCqqgAAAAAAAAAAAAAAAAAAAAAAAKWiC" +
"gARAAAAAAAAAAAAAAAAAAAAAAAAURVRVQIAAAAAAAAAAAAAAAAAAAAAAABwqEoiAgAAAAAAAAAAAAAAAAAAAAAAAAAIACAAAAAAA" +
"AAAAAAAAAAAAAAAAAAAAAAAAAAAAAAAAAAAAAAAAAAAAAAAAAAAAAAAAAAAAAAAAAAAAAAAAAAAAAAAAAAAAAAAAAAAAAAAAAAAA" +
"AAAAAAAAAAAAAAAAAAAAAAAAAAAAAAA");

ev3.getBrick().getScreen().drawImage(imgWorker02, 0, 0);
ev3.sleep(5000);
Sample script with Screen object (decode image):
// Screen API
// Build an image
var smiley = ev3.getBrick().getScreen().buildImage(
  "XXXXXXXXXXXXXXXXXXXXXXXXXXXXXX"
  "X                            X"
  "X                            X"
  "X                            X"
  "X                            X"
  "X                            X"
  "X    XXXX             XXXX   X"
  "X     XX               XX    X"
  "X                            X"
  "X                            X"
  "X                            X"
  "X                            X"
  "X                            X"
  "X                            X"
  "X                            X"
  "X                            X"
  "X                            X"
  "X                            X"
  "X                            X"
  "X                            X"
  "X    XX                XX    X"
  "X      XX            XX      X"
  "X        XXXXXXXXXXXX        X"
  "X                            X"
  "X                            X"
  "X                            X"
  "X                            X"
  "X                            X"
  "X                            X"
  "XXXXXXXXXXXXXXXXXXXXXXXXXXXXXX "
  );

ev3.getBrick().getScreen().drawImage(smiley, 40, 40);
ev3.sleep(5000);
4.15. The Battery object
Sample script with Battery object:
// Battery API
var battery = ev3.getBrick().getBattery();
ev3.notify("Battery current: " + battery.getBatteryCurrent());
ev3.notify("Motor current: " + battery.getMotorCurrent());
ev3.notify("Voltage: " + battery.getVoltageMilliVolt());
4.16. The XSensor object
The XSensor enable you to use sensors of the device used to access to the EV3 brick. For example you can use the gyroscope sensor of your tablet, or you can use the webcam of your laptop.
This has two main benefits:
-
Have new sensors for free (you already have the tablet or the laptop !).
-
Use these new sensors in your program as simply as if they were Lego sensors.
There is API common to all XSensors:
|
For all XSensor values there is function |
4.16.1. The xTouch XSensor
The aim of the xTouch sensor is to provide an easy to define a keyboard (24 touchs) that can be used in order to send "action" to the ev3. In some sense, it can be seens as a super beacon (see RemoteCommandResult object)
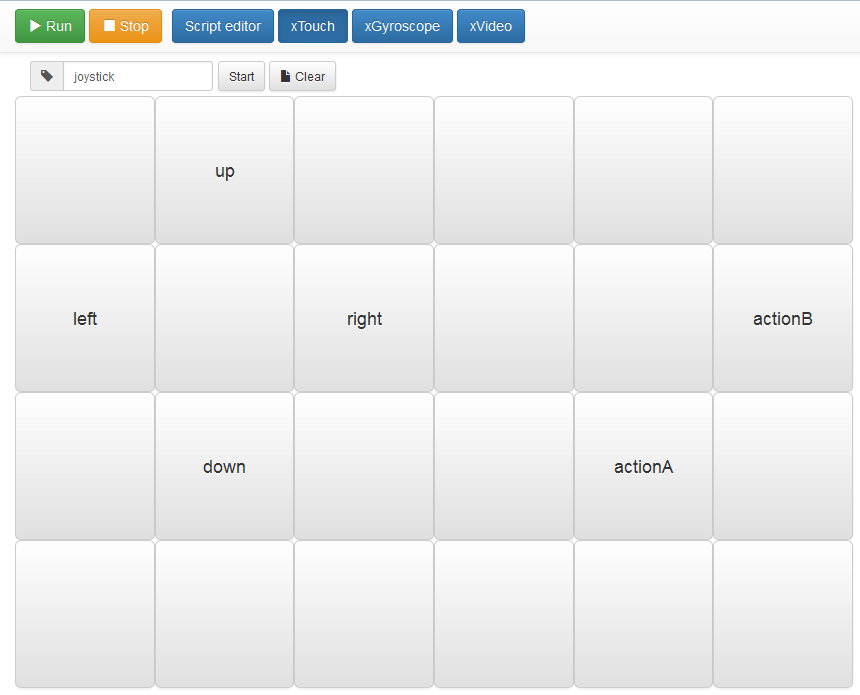
In the screen, you can:
-
Set the sensor name (in the screenshot: "joystick").
-
xTouch not started: Configure the xTouch sensor, that is to say set the buttons actions names: Click on a button and set the list of actions (comma separated) for the button.
-
xTouch started: While a button was clicked, the action was sent to the EV3 brick, while the button was no more clicked, the action is canceled. On multi-touch devices, you can click/touch several buttons at the same time.
Note: While started, the buttons not configured (without associated actions) will be disabled.
Here are the fields available on the XTouch XSensor:
|
Only the active touches are available within the XSensor values. |
Touch object
Sample script with xTouch XSensor:
// xTouch XSensor
// Configure the xTouch sensor with at least one touch "up"
var xTouch = ev3.getXSensor("xTouch");
while(ev3.isOk()) {
  var value = xTouch.getValue();
  if(value.isStarted()) {
    if(value.containsTouch("up")) {
      ev3.notify("You have clicked the 'up' touch !");
    } else {
      ev3.notify("Click on 'up'");
    }
  }

  ev3.sleep(100);
}
4.16.2. The xGyro XSensor
The aim of the xGyro sensor is to provide an access to the gyroscope sensor of a tablet or a smartphone. The EV3 brick can use in real-time the information for the x, y and z axis.
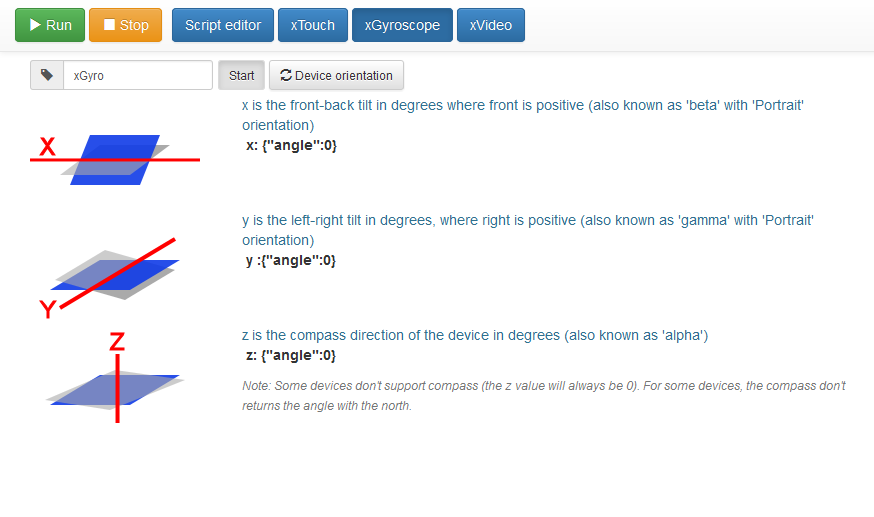
In the screen, you can:
-
Set the sensor name (in our example: "xGyro").
-
Set the orientation of the device (portrait/left landscape/right landscape, reverse portrait) in order to have the right values on each axis.
-
Start the xGyro sensor.
|
In order to avoid annoying screen rotation, think to disabled the auto rotate on your device while using the xGyro sensor. |
Axis object
Sample script with xGyro XSensor:
// xGyro XSensor
var xGyro = ev3.getXSensor("xGyro");

while(ev3.isOk()) {
  var value = xGyro.getValue();
  if(value.isStarted()) {
    var y = value.getY().getAngle();
    var x = value.getX().getAngle();

    ev3.notify("XGyro - x: " + x + ", y: " + y);
  }

  ev3.sleep(100);
}
4.16.3. The xVideo XSensor
The aim of the xVideo sensor is to provide an access to the webcam of a laptop or a tablet. You can indicate one or several object that are tracked. The EV3 brick can use in real-time the position of all the tracked objects.
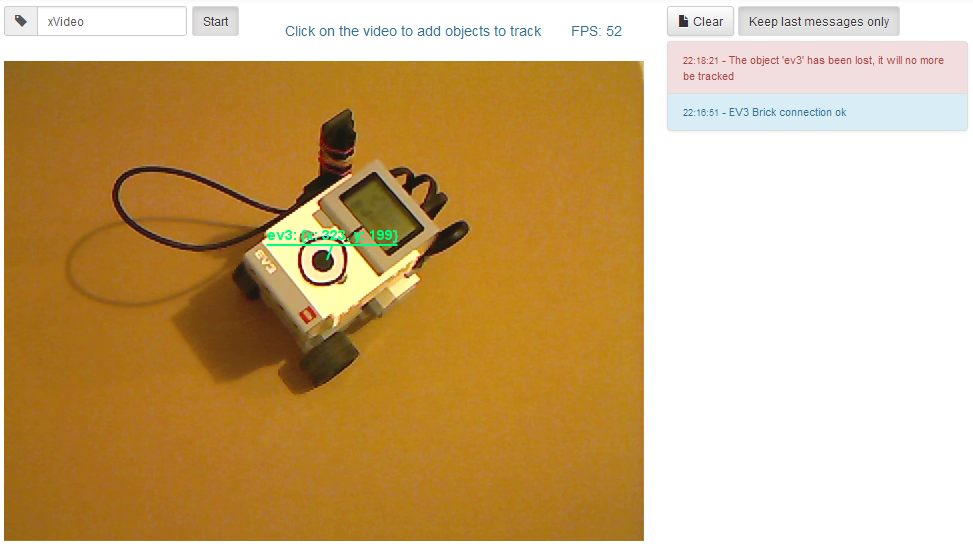
In the screen, you can:
-
Start the xVideo sensor. While starting the browser will certainly ask you to select the webcam to use (and to give the authorization to use this webcam).
-
Select objects to track: Click on the video to select the objects to track. You can give the name you want to the object. You can also change the name by clicking again on the object.
|
There is several important point to note about the tracking algorithm used:
Note: The algorithm used was the Lucas-Kanade method (See wikipedia for more details). |


VisibleObject object
Sample script with xVideo XSensor:
// xVideo XSensor
// Configure the xVideo sensor to track one object called "myTarget"
var xVideo = ev3.getXSensor("xVideo");
while(ev3.isOk()) {
  var value = xVideo.getValue();
  if(value.isStarted()) {
    if(value.containsObject("myTarget")) {
      var t = value.getObject("myTarget");
      ev3.notify("Target found: [" + t.getX() + ", " + t.getY() + "]");
    } else {
      ev3.notify("Hey, select a target and call it 'myTarget'");
    }
  }

  ev3.sleep(100);
}
4.16.4. The xGeo XSensor
The aim of the xGeo sensor is to provide an access to the GPX sensor of a tablet or a smartphone. The EV3 brick can use in real-time the information for the latitude, longitude and altitude.
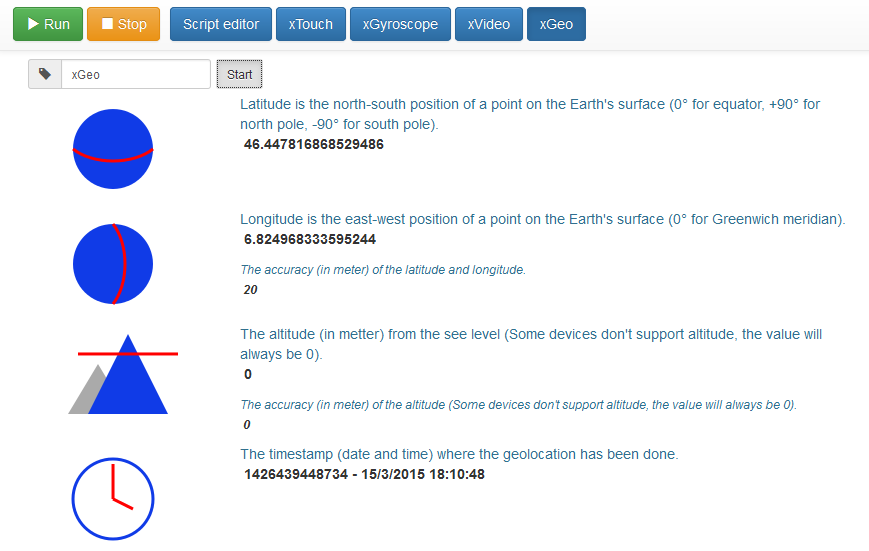
In the screen, you can:
-
Set the sensor name (in our example: "xGeo").
-
Start the xGeo sensor.
Sample script with xGeo XSensor:
// xGeo XSensor
var xGeo = ev3.getXSensor("xGeo");
while(ev3.isOk()) {
  var value = xGeo.getValue();
  if(value.isStarted()) {
    ev3.notify("Latitude: " + value.getLatitude() + ", longitude: " + value.getLongitude()
      + ", accurancy: " + value.getAccuracy() + ", timestamp: " + value.getTimestamp());
  }

  ev3.sleep(2000);
}|
The GPS coordinate are currently requested to be acquired every 30 seconds. |
4.16.5. Advanced usage
You can use several xSensor at the same time. Theses sensors can be on the same device or on several devices. For example, you can run on the same device the xGyro sensor and the xTouch sensor. Another example could be to run the xGyro sensor on one device and the xVideo sensor on another device.
|
However it is recommended to limit to:
|
A note on the behaviour of the function ev3.isOk() while using XSensors: Even if not configured (see Configuration object)
this method will automatically wait a bit while one or several XSensors are actively sending data to the brick. This waiting time
will be automatically reset while there is no more active XSensors.
Note: The aim of this small waiting time is to let the EV3 CPU process the XSensors incoming values in a proper way.
5. Script samples
5.1. Sample index
| API | Sample that use this API |
|---|---|
All samples. |
|
All samples. |
|
All samples. |
|
A robot controlled with the remote beacon, |
|
On Youtube: Gnikrap introduction to EV3 programming with Javascript |
|
5.2. The standard template
|
We present here the "standard" template for a script within Gnikrap. This template is automatically loaded while you start Gnikrap. |
// Initialization
// ... (1)


// You can also define functions here if needed
// ... (2)


// Perform calibration if needed
// ... (3)


// Main loop - This is the main program
while(ev3.isOk()) {
  // ... (4)
}

// Finalization
// Note: The finalization must run very fast, otherwise the script will be force-killed
// ... (5)| 1 | You will typically found here all the initialisation of the ev3 objects: Retrieve the sensors/motors objects, define and initialize "global" variables, perform other initializations that can take some times. |
| 2 | Here you can define functions that will be used later. It can typically be some algorithm or computation function. |
| 3 | Here you can perform calibration, Typically, these calibration (eg. default light sensor level calibration, etc.) have to be done only once at the beginning of the script. |
| 4 | Here is the main loop of your program. It is important to have ev3.isOk() in the
while condition in order to be able to stop gently the script while using the "Stop" button (in fact, ev3.isOk()
will returns false once the Stop button was clicked ⇒ The main loop will exit in a clean way). If you don’t
put this condition, the script will be stopped abruptly (force-closed). |
| 5 | You can perform some finalization here. However theses finalization should be very quick otherwise the script will be force-closed. Note: You can increase the time before the script was force-closed with the ev3.getConfiguration() object. |
5.3. Remote control a robot
|
In the following examples we will control a robot (it can be always the same robot) in different ways. |
5.3.1. A robot controlled with the remote beacon
The aim of the sample is to pilot with the EV3 beacon a robot made of:
-
1 motor for a left wheel (or caterpillar)
-
1 motor for the right wheel (or caterpillar)
-
1 infrared sensor for the receiving remote beacon data
-
(option) 1 motor to launch ball (like in standard EV3 sample)
///////////////////////////////////////////////////////////////////////////////
// Note: Please adjust the port to what is physically connected on your brick.
///////////////////////////////////////////////////////////////////////////////

// Initialization (1)
var leftMotor = ev3.getBrick().getLargeMotor("C");
leftMotor.setSpeedPercent(90);
var rightMotor = ev3.getBrick().getLargeMotor("B");
rightMotor.setSpeedPercent(90);
var medMotor = ev3.getBrick().getMediumMotor("A");
medMotor.setSpeedPercent(75);
var irSensor = ev3.getBrick().getIRSensor("4");


// Main loop (2)
while(ev3.isOk()) {
  var rc = irSensor.getRemoteCommand(); // (3)
  // Left motor (4)
  if(rc.isTopLeftEnabled()) {
      leftMotor.backward();
  } else if(rc.isBottomLeftEnabled()) {
      leftMotor.forward();
  } else {
      leftMotor.stop();
  }
  // Right motor (5)
  if(rc.isTopRightEnabled()) {
      rightMotor.backward();
  } else if(rc.isBottomRightEnabled()) {
      rightMotor.forward();
  } else {
      rightMotor.stop();
  }
  // Fire (6)
  if(rc.isBeaconEnabled()) {
      medMotor.rotate(3* 360);
      while(irSensor.getRemoteCommand().isBeaconEnabled() && ev3.isRunning()) {
          // Wait that the beacon button was released
      }
  }
}


// Finalization
// None (motors will be automatically stopped)| 1 | Here we retrieve all ev3 objects needed in the main loop. Caution: The port has to match with what is physically connected on the brick |
| 2 | The "program" itself. We have 4 main parts: |
| 3 | We retrieve the value of the remote beacon. This value has to be retrieve at each loop because the value change according to the button enabled or not. |
| 4 | The motor for the left BELT which is managed, so we make the motor going forward/backward or stopped according to the buttons enabled. |
| 5 | The same for the right BELT motor. |
| 6 | While the beacon button was pressed: Fire a ball (3 turn of the mid-sized motor). While it’s done, we wait that the beacon button was no more enabled before return to the main loop (this is to avoid multi-fire). |
In this sample, two buttons are associated to one motor, so we have something like that with our 4 buttons:
Beacon button: Special action (fire in out sample) |
|
Top left button: Left motor forward |
Top right button: Right motor forward |
Bottom left button: Left motor backward |
Bottom right button: Right motor backward |
5.3.2. A robot controlled with the xGyro sensor
See the video of this sample: Gnikrap xSensor: 2 axis Gyroscope for Lego Mindstorm EV3
The aim of this sample is to pilot a robot with the gyroscope of a device.
The robot is to be made of:
-
1 motor for a left wheel (or caterpillar)
-
1 motor for the right wheel (or caterpillar)
|
You also need a device (computer, tablet or smartphone) connected to the EV3 (and running Gnikrap) with a 2 axis gyroscopic sensor. |
///////////////////////////////////////////////////////////////////////////////
// Note: Please adjust the port to what is physically connected on your brick.
///////////////////////////////////////////////////////////////////////////////

// Initialization (1)
var left = ev3.getBrick().getLargeMotor("D");
var right = ev3.getBrick().getLargeMotor("A");
var xGyro = ev3.getXSensor("xGyro");


// Define a function that activate (or not) one motor with the given percentage (positive or negative) (2)
function activateMotor(motor, powerInPercent) {
    if(Math.abs(powerInPercent) < 10) { // (3)
        motor.stop();
    } else if(powerInPercent > 10) {
        motor.setSpeedPercent(powerInPercent);
        motor.forward();
    } else if(powerInPercent < 10) {
        motor.setSpeedPercent(-powerInPercent);
        motor.backward();
    }
}


// Main loop - This is the main program (4)
while(ev3.isOk()) {
    var gyro = xGyro.getValue();

    if(gyro.isStarted()) { // (5)
        var x = gyro.getX().getAngle();
        var y = gyro.getY().getAngle();

        var leftPower = 0;
        if(x > 10) {
            leftPower = -(Math.min(Math.round(2*x), 100)); // Back (-) => Forward (+)
        } else if(x < -10) {
            leftPower = Math.min(Math.round(2*-x), 100);
        }
        var rightPower = leftPower;

        if(y > 10) {
            if(leftPower >= 0) {
                leftPower += Math.min(Math.round(y), 50);
                if(rightPower == 0) {
                    rightPower = -leftPower;
                }
            } else {
                leftPower -= Math.min(Math.round(y), 50);
            }
        } else if(y < -10) {
            if(rightPower >= 0) {
                rightPower += Math.min(Math.round(-y), 50);
                if(leftPower == 0) {
                    leftPower = -rightPower;
                }
            } else {
                rightPower -= Math.min(Math.round(-y), 50);
            }
        }

        activateMotor(left, leftPower);
        activateMotor(right, rightPower);
    } else { // (6)
        activateMotor(left, 0);
        activateMotor(right, 0);
    }
}

// Finalization
// None (motors will be automatically stopped)| 1 | Here we retrieve all ev3 objects needed in the main loop. Caution: The port has to match with what is physically connected on the brick |
| 2 | We define a function that enable to make a motor, go forward, go backward or stop according to a power value (between -100 and 100) |
| 3 | We use the standard Javascript Math object in order to make our computations (See http://www.w3schools.com/js/js_math.asp) |
| 4 | The "program" itself. Two main cases: |
| 5 | 1st case: xSensor is on, we compute the left motor and right motor power according to the x and y angle returned by the xGyro sensor (see below for more details on the motor power computation). |
| 6 | 2nd case: xSensor is off, we ensure that the motor are stopped. |
- Motor power computation
-
-
The x axis is used to control the forward/backward direction.
-
The y axis is used to control the left/right direction.
-
The motor speed is proportional to the angle. The variation is computed from 10° and 50° (which is the maximum).
-
| x < -10° | -10° < x < 10° | x > 10° | |
|---|---|---|---|
y < -10° |
Go forward and left. |
Move left in place, i.e. motor with opposite speed. |
Go backward and left. |
-10° < y < 10° |
Go forward (no turn). |
Don’t move. |
Go backward (no turn). |
y > 10° |
Go forward and right. |
Move right in place, i.e.(otor with opposite speed. |
Go backward and right. |
5.3.3. A robot controlled with the xTouch sensor
The aim of this sample is to pilot a robot with the keyboard on the screen of a device (can be with the mouse or with a tactile screen).
The robot is to be made of:
-
1 motor for a left wheel (or caterpillar)
-
1 motor for the right wheel (or caterpillar)
|
You also need a xTouch configured with 4 touches: up, down, left and right (see snapshot in The xTouch XSensor for a configuration sample). |
///////////////////////////////////////////////////////////////////////////////
// Note: Please adjust the port to what is physically connected on your brick.
///////////////////////////////////////////////////////////////////////////////

// Initialization  (1)
var leftMotor = ev3.getBrick().getLargeMotor("D");
var rightMotor = ev3.getBrick().getLargeMotor("A");
var xTouch = ev3.getXSensor("xTouch");

function activateMotor(motor, powerInPercent) {  // (2)
    if(powerInPercent < 0) {
        motor.setSpeedPercent(-powerInPercent);
        motor.backward();
    } else if(powerInPercent > 0) {
        motor.setSpeedPercent(powerInPercent);
        motor.forward();
    } else {
        motor.stop();
    }
}

function activateLeftAndRightMotor(leftPowerInPercent, rightPowerInPercent) { // (3)
    activateMotor(leftMotor, leftPowerInPercent);
    activateMotor(rightMotor, rightPowerInPercent);
}

// Main loop - This is the main program (4)
while(ev3.isOk()) {
    var val = xTouch.getValue();

    if(val.isStarted()) { // (5)
        var up = val.containsTouch("up") && !val.containsTouch("down");
        var down = val.containsTouch("down") && !val.containsTouch("up");
        var left = val.containsTouch("left") && !val.containsTouch("right");
        var right = val.containsTouch("right") && !val.containsTouch("left");

        if(up) {
            if(left) {
                activateLeftAndRightMotor(50, 90);
            } else if(right) {
                activateLeftAndRightMotor(90, 50);
            } else {
                activateLeftAndRightMotor(90, 90);
            }
        } else if(down) {
            if(left) {
                activateLeftAndRightMotor(-50, -90);
            } else if(right) {
                activateLeftAndRightMotor(-90, -50);
            } else {
                activateLeftAndRightMotor(-90, -90);
            }
        } else {
            if(left) {
                activateLeftAndRightMotor(-50, 50);
            } else if(right) {
                activateLeftAndRightMotor(50, -50);
            } else {
                activateLeftAndRightMotor(0, 0);
            }
        }
    } else { // (6)
        activateLeftAndRightMotor(0, 0);
    }
}

// Finalization
// None (motors will be automatically stopped)| 1 | Here we retrieve all ev3 objects needed in the main loop. Caution: The port has to match with what is physically connected on the brick |
| 2 | We define a function that enable to make a motor, go forward, go backward or stop according to a power value (between -100 and 100) |
| 3 | We define another function that enable to control both motors with one function call. |
| 4 | The "program" itself. Two main cases: |
| 5 | 1st case: xSensor is on, we compute the left motor and right motor power according to touches enabled. |
| 6 | 2nd case: xSensor is off, we ensure that the motor are stopped. |
5.4. A robot that stay in the video
See the video of this sample: Gnikrap xSensor: Webcam for Lego Mindstorm EV3
The aim of this robot is to have robot that stay in the video acquired by your webcam (that is connected/embedded to your laptop or tablet).
The behaviour of the robot will be quite simple: go forward and while your reach the border of the video, go a bit backward, turn and… go forward again !
The robot is to be made of:
-
1 motor for a left wheel (or caterpillar)
-
1 motor for the right wheel (or caterpillar)
|
You also need a device with a webcam that is able to make the xVideo sensor work at a minimun framerate of 20 FPS (frame per second, the value is displayed on top of the video). |
///////////////////////////////////////////////////////////////////////////////
// Note: Please adjust the port to what is physically connected on your brick.
///////////////////////////////////////////////////////////////////////////////

// Initialization  (1)
var leftMotor = ev3.getBrick().getLargeMotor("D");
var rightMotor = ev3.getBrick().getLargeMotor("A");
var xVideo = ev3.getXSensor("xVideo");

// The margin in order to consider that we reach the border
var borderMargin = 80;

// Motor should not go too fast in order to don't "loose" the ev3
leftMotor.setSpeedPercent(30);
rightMotor.setSpeedPercent(30);

// Function in order to check if the ev3 is near from the xSensor "vision" border (2)
function isNearToBorder(visibleObject) {
    return (visibleObject.getX() < borderMargin) || (visibleObject.getY() < borderMargin)
        || ((visibleObject.getX() + borderMargin) > 640) || ((visibleObject.getY() + borderMargin) > 480);
}

// Function to move backward and make a random turn (3)
function backwardAndTurnRandomly() {
    leftMotor.rotate(-360, true);
    rightMotor.rotate(-360);

    var r = 180 + Math.random() * 270;
    leftMotor.rotate(r, true);
    rightMotor.rotate(-r);
}

function stopMotors() { // (4)
    leftMotor.stop();
    rightMotor.stop();
}

// Main loop - This is the main program (5)
while(ev3.isOk()) {
    var val = xVideo.getValue();

    if(val.isStarted()) { (6)
        if(val.containsObject("ev3")) { (7)
            if(isNearToBorder(val.getObject("ev3"))) {
                ev3.notify("Close to the border " + val.getObject("ev3") + ", need to change direction");
                backwardAndTurnRandomly();
            } else {
                leftMotor.forward();
                rightMotor.forward();
            }
        } else {
            stopMotors();
            ev3.notify("I don't find the 'ev3', please select it !");
            ev3.sleep(200);
        }
    } else {
        stopMotors();
        ev3.notify("I don't see nothing, please start the xVideo sensor !");
        ev3.sleep(200);
    }
}

// Finalization
// None (motors will be automatically stopped)| 1 | Here we retrieve all ev3 objects needed in the main loop. Caution: The port has to match with what is physically connected on the brick |
| 2 | We define a function that enable to known if a VisibleObject object is near the border. The function returns true if the VisibleObject is close to the border, false otherwise. |
| 3 | We define a function that enable the robot to change direction while it is close to the border. In this function you have to notice the two different call to rotate(). We want both motor to run at the same time, so we
request an immediate return of the rotate() function for the 1st motor.Another point is the use of the method random of the standard Javascript Math object (See http://www.w3schools.com/js/js_math.asp) |
| 4 | Finally we define a function that stop both motors. |
| 5 | The "program" itself. |
| 6 | If the xSensor is on, go ahead, if off notify the user. |
| 7 | Then we check that an ev3 object is currently visible, if not notify the user. If visible, we go forward until the border of the video. While the border has been reached, the ev3 make a turn and then go forward again. |
5.5. Advanced usage
|
The syntax for some advanced feature can change in future versions of Gnikrap. This is not directly linked to Gnikrap but to the version of Java used: |
5.5.1. Import scripts
TODO - Will certainly be done while the switch to Java8 was done
5.5.2. Using existing Java API
You can use any java library that is in the classpath within the javascript script.
|
If you use leJOS directly it is important to don’t use the Gnikrap API |
Here is an example where we use the leJOS API directly:
// WARNING: Don't use the ev3.getBrick() function if you make direct call to leJOS

importPackage(Packages.lejos.hardware); // For Button (1)
importPackage(Packages.lejos.hardware.motor); // For EV3LargeRegulatedMotor
importPackage(Packages.lejos.hardware.port); // For MotorPort

// Make the keyboard led green and blink
Button.LEDPattern(4); // 1 (green) + 3 (blink) (2)


// Use a motor
var motor = new EV3LargeRegulatedMotor(MotorPort.A); // (2)
motor.rotate(360);

while(ev3.isOk()) { // Can still use ev3 function (3)
    ev3.sleep(100);
}| 1 | You can import Java packages (don’t forget to prefix your package with Packages) in order to use the classes belonging to theses packages.Caution: The importPackage syntax can change in future version of Gnikrap. |
| 2 | You can then use and instantiate Java object directly within the script. |
| 3 | You can also use ev3 function while needed. |
|
You can also use "your" jar libraries (found on the internet or home-made). Simply put the library within the
Gnikrap You can now use the libs as described below. |
6. Changelog
------------------------------------------------------------------------------

Current stable release is: 0.5.0


------------------------------------------------------------------------------

Version history:
 0.5.0 (15JUL2017 - Visual programming / JS autocompletion):
    - Blockly:
      - Blockly blocks added: logic, loops, math, text, lists, variables, functions
      - Gnikrap blocks created: EV3 brick, Color sensor, IR sensor, Touch sensor, Motors
      - Realtime 'Warning'/'Error' on erroneous blocks / erroneous use of ports
      - Javascript code generation and visualization (can copy/paste in JavaScript editor)
      - Load and save blockly scripts
    - Settings dialog added (switch language and Text/Visual programming)
    - Demo mode added (GUI can be launched without error even if not installed on an EV3)
    - Autocompletion added in javascript editor (use [Ctrl]+[Space])
    - Load/save xKeyboard added
    - Add an API to exit from the script
    - Add experimental support for NXTSound sensor and Ultrasonic sensor
    - Documentation updated
    - Update versions of some library used (ace.js, undertow, ...)

    - Fix:
      - French translation is now working (translation files are now checked at build time)

 0.4.0 (28APR2015 - leJOS Firmware/Menu integration)
    - Easy to use (no more need telnet/ssh/scp) / leJOS integration:
      - Automated GUI installation on Windows.
      - Shell script (for the EV3) for others platforms.
      - Gnikrap is installed as a leJOS 'Program', it can be launched directly from the leJOS menu
      - Shutdown EV3 brick / Stop Gnikrap (<=> return to leJOS menu) from the Gnikrap user interface
    - xGeo (GPS) xSensor added
    - Update versions of some library used (especially: leJOS updated to 0.9.0-beta)
    - Documentation updated

    - Fix:
      - API for the EV3 brick screen is now operational (include import of images for displaying on the EV3 screen)


 0.3.0 (30JAN2015 - xSensors):
    - Add xSensors (eXternal Sensors) feature:
      - xTouch (24 multi-touch on screen keyboard),
      - xVideo (video object tracking),
      - xGyro (gyroscope)
    - Rework and improve the GUI (now works fine on Android)
    - Improve the script API
    - Documentation updated, new samples added
    - Add automatic EV3 brick reconnection (in case of connection lost)


 0.2.0 (30NOV2014 - First public release):
    - Load/Delete/Save script added
    - About box added
    - GUI Internationalization (English and French are available)
    - Jackson JSON parser replaced by 'minimal-json' which is faster on the EV3 hardware
    - Documentation added
    - Improve the script API to manipulate the EV3 brick


 0.1.0 (private release):
    - Proof of concept: Ensure that the performance reached are acceptable
    - Simple API to manipulate the EV3 brick:
      - Battery
      - Sound: play tone, play note
      - Keyboard: leds and buttons
      - Screen (very limited support): only clear :-(
      - Touch sensor
      - Color Sensor: reflected, ambiant, color
      - IR Sensor: distance, seek beacon, remote command
      - Motors: speed, rotate, tacho "sensor", forward, backward


------------------------------------------------------------------------------

Features to add (no specific order):
 - Add import/export feature (save all the data on the ev3 in one operation) - Will be done while JRE 1.8 is the default leJOS JRE.
 - Add real time sensor probes
 - Add port checking (auto detection for EV3 devices)
 - Add API for other LEGO EV3 sensors (Gyro sensor) - Will be done while I buy these two sensors :-)
 - Add new xSensors (eg. xAudio) and other modes to existing xSensors (eg. video object detection for balls/round items, etc.)
 - Add support for leJOS 0.9.1-beta (currently 0.9.0-beta)


------------------------------------------------------------------------------

Known defects:
 - (0.3.0 and following) - Firefox on android, a cosmetic display problem on the xTouch xSensor
 - (0.3.0 and following) - Chrome on android, a display problem on the full screen mode
 - (0.4.0 and following) - xVideo don't work with some combinaison of webcam/browser
 - (0.4.0 and following) - Seems don't work with version 0.9.1-beta of leJOS (works with 0.9.0-beta)


------------------------------------------------------------------------------

Work in progress:
 0.6.0:
    - TBD

    - Fix:
      - TBD